Let's Go Everywhere, Man!
“Leave your stupid comments in your pocket!"
— Mark, ‘The Room’
We’ve gone from patching binaries by hand, hooking functions with FRIDA and writing our own little virus to finding and exploiting a real-world remote code execution (RCE) vulnerability.
In keeping with the theme of jumping around, we’re going to have a thorough look at a web app in order to get up to speed on some of the web-specific attack vectors and exploitation mechanisms. Ah, the Internet: Finally we’re on my home turf.
This article is structured chronologically to best reflect my discovery process. I’m not interested in checklists, so we’re not going to stop at a potential vulnerability, but instead try to actually exploit it.
I guess you’d call this a grey box test. I don’t have the source code, but a VM environment where everything is deployed for local testing. This saves us time and makes discovering certain issues much simpler.
Disclaimer
As always, I’m acting in good faith here. It’s all about education. And what better way to get educated than to study a real-world example?
I don’t want to throw shade on anyone, so for now everything vendor-specific is censored in some way or another.
Spoiler alert: We’ll find quite a lot of nasty things. The vendor is informed and might or might not take action. If so, I’ll make sure to update the article accordingly.
Context
What’s our target this time? It’s basically an enterprisey Dropbox equivalent. They attempt to make FTP and Mail (attachments) obsolete by providing a platform for sharing, communicating and collaborating internally as well as externally (by sharing links to files).
There are different kinds of separation in place that can be used to restrict access. People can be part of a specific room, which authorizes them to see the files and comments inside of it. There are also different permissions, like being able to read/write/delete files in a room. You know, the usual stuff.
We’ll get more into the functionality as we explore the app.
The whole thing is an ASP.NET MVC application running on IIS. Well, at least the self-hosted variant is running on IIS, because there’s also a cloud-hosted version available, which I didn’t touch at all and therefore cannot speak for.
At the end of our journey, we’ll have gone almost everywhere. But let’s not get ahead of ourselves and simply start exploring…
Let Me Execute That for You
As a self-proclaimed security expert, what do we do first? Install Kali Linux? Set up Burp, ZAP or mitmproxy?
Nope, we’re playing with the website like it’s Cookie Clicker! Naturally, we also enter alert(1) everywhere we can. That’s because we’re looking for some cross-site scripting (XSS) opportunities.
XSS comes in different shapes and forms, but it boils down to executing arbitrary JavaScript (JS) in the browser of another user.
Input fields are always a good place to look for XSS vulnerabilities. The idea is that our input gets stored and incorporated into the site on subsequent visits.
That sounds like the definition of comments, so let’s test those first. Luckily, every uploaded file has a comment section. Writing our payload into the input field and saving it simply displays the comment verbatim:
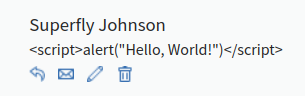
Figure 1: Escaped payload in comment
There must be some kind of sanitization in place, but where exactly? Maybe we get lucky and it’s only done on the client-side.
We bust out the first big tool for further investigating the issue: Our trusty browser!
After inspecting the request with the browser’s developer tools, we see the following payload:
| |
Our data gets percent encoded, so let’s revert it:
| |
That certainly doesn’t look like our original comment. What happened here?
Well, imagine you want to display an opening angle bracket on a web page. You cannot simply put it there, because it would be misinterpreted as the beginning of an HTML tag. In order to prevent this, we can make use of HTML entities, which are strings used for displaying reserved or invisible characters. Our < becomes < for example.
There is another feature of the comment section that catches our attention: One can write bold, italic and underlined text. Let’s see how that’s handled on the request level (already without percent encoding):
| |
AHA! So some tags get a pass. Could it be… Let’s change the content value manually to a simple XSS testing payload and resend1 the request.
| |
In this case we don’t even bother with percent encoding. But does it work?
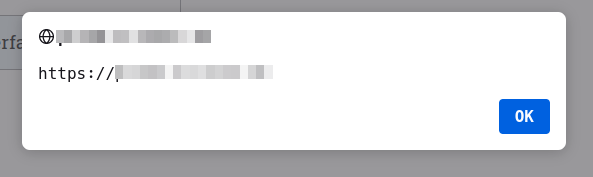
Figure 2: Successful execution of alert()
Well, that was easy! The only sanitization is done on the client-side, which makes bypassing it as simple as sending our desired payload directly to the endpoint. We’re off to a good start here, but what can we actually do with a stored XSS vulnerability in 2022?
Let Me Write That Down for You
Okay, so we can inject a script tag into the page containing arbitrary JS code that gets executed on page load in the context of a user’s browser.
In the old days, we would simply go on to exfiltrate their sweet cookies.
Obtaining a session cookie means we can impersonate the user. In the eyes of the server, we are the other user if we send their cookie along our own requests.
In order to prevent this, modern browsers can impose restrictions on cookies. The most interesting for us is the HttpOnly attribute. We cannot access cookies via JS that have it set. They get, however, automatically attached to every request by the browser.
Well, they don’t if they have another attribute set: SameSite.
Our website has all the right attributes set, so exfiltrating cookies is off the table. But what can we do?
Well, in theory we can make arbitrary request to the site from the user’s context. Think password change2. There are hurdles like CSRF tokens, but nothing we cannot overcome.
The potential damage strongly depends on the user’s privileges and the kind of interactions that the website provides, so it’s very domain specific (no pun intended).
We, however, are going for a more general approach: Stealing clear-text passwords from password managers.
Wait, I thought those were secure? Tell me more!
Stealing Passwords the Easy Way
Being able the execute JS in the target’s browser may not seem like much with all the heavy sandboxing of modern browsers.
You have to remember, though: it’s JavaScript! We may be sandboxed, but oh boy is it a luxuriant sandbox!
As already mentioned, we can make arbitrary HTTP requests, programmatically interact with the UI3 or alter the appearance of the site altogether.
There’s another thing, though: We can create new elements and append them to the Document Object Model (DOM), which makes them become part of the website.
Do you see where this is going?
What about creating a hidden password input, waiting for the target’s password manager or browser to do the autofilling and retrieving the value:
| |
The above code doesn’t do the trick! Reading the input’s value in line 7 happens way too fast for any autofilling to take place.
Wait, aren’t web pages heavily focused around events? What if we’d register an event handler that listens for value changes in our input:
| |
Nice and clean!
We only log the password to the console here, but in reality we would ship it off to somewhere else.
There’s only a little problem: I’ve tested the above code on Firefox for Windows. It worked.
Sadly, that’s not the case for pretty much every other browser: Edge and Chrome on Windows and even Firefox (the same version!) on Linux didn’t autofill the password input.
I have no explanation for this, specifically the two Firefox versions throw me off. So your guess is as good as mine here. But if it happens to be better, please holla at me.
We’ve long proven that a XXS vulnerability exists, but we’re definitely not leaving without proper exploitation. So back to the drawing board it is.
Stealing Passwords the Slightly More Complicated Way
All the aforementioned browsers do autofill the login form correctly, so there has to be a way of achieving the same.
At first I’ve simply include the whole login form into our payload.
Everybody talks about code execution, but nobody is stopping us from adding other elements besides script nodes to the DOM through the existing vulnerability:
Figure 3: Additional <form> in comment
“Yo dawg, I herd you like inputs, so I put an input in your textarea so you can write while you write.”4
Sadly, the form didn’t get autofilled. After experimenting quite a bit, I’ve found a solution:
If we set the username input (type text) to our valid login mail address, the password input (type password) will get autofilled.
What? Why?
I have no idea how the username gets filled in on the legitimate login page. Maybe it’s simply a timing thing, but we’ll have to take it for what it is.
With this discovery, a plan takes shape:
- Get hold of the username
- Create a form and two inputs
- Set the first input to the username
- Append the form to the
DOM - Wait a second
- Retrieve the password from the second input
- Write a blog post about the process
Major spoilers: It actually works! Here’s the final version:
| |
While not everything might be clear at first glance, we’re basically just following our plan from above.
First off, we need an async function (line 12) in order to be able to await the requests we’re about to make.
We fetch the user’s profile page (line 13)5 and use a regular expression (line 15) to extract their email address (which can be used instead of the username). This is a simple demonstration, but the exact same method can be applied to retrieve CSRF tokens in order to defeat additional security measures. Pretty neat, huh?
After having retrieved a valid username, we create a simple HTML string with the createFormString() function (line 3) that contains a form and two inputs.
We do it this way so that one of the inputs is set to the username using string interpolation before getting appended to the DOM. Again, my tests showed that the value has to be present the very second we add the form element to the page.
Afterwards we create a dummy div element that holds our form in its innerHTML property. Thankfully, the DOM APIs can deal with strings just fine, so we append the div (and therefore our form) to the DOM in line 20.
That whole thing has to be wrapped inside script tags, percent encoded and attached to the request.
After a page load and a second of waiting, we see this:
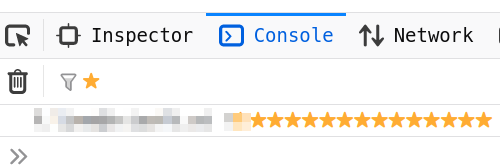
Figure 4: Logging credentials to console
That’s right, gimme those passwords!
While I don’t know how many people use autofill features, I’d assume it’s a hefty chunk.
I don’t have to tell you how useful it is to obtain actual passwords, but I’ll do it anyway: They usually don’t expire like cookies do. But more importantly, they may be reused across websites and services, which makes them valuable for gaining an initial foothold into a network.
Lastly, our particular website has a feature that makes this attack even more useful: You can actually inform people about comments via email directly from the page, which means you can spear fish admins instead of waiting patiently for very important persons to view your comment.
This concludes our little XSS journey for now. While certainly not a particular hard to find vulnerability, it still serves as a great example for what’s possible with the power of JavaScript at our fingertips.
Pro Restling
Having found a solid post-authentication vulnerability, we’re about to shift our focus to the outside. One exposed component comes to mind first:
The REST API.
The main reason for paying close attention to this component is the vendor’s track record. Maybe there’s also functionality here that can be reached without authenticating at all.
But aside from that, components that get added later as part of some new requirements are always worth thorough testing. The developers might have cut some corners in order to integrate them into the existing design.
Now I don’t know if that’s the case here, but as we’ll soon learn, there’s evidence that the API was foremost meant for internal usage.
Maybe that’s the reason why no documentation exists. Nothing. Zip.
We’re not discouraged, though, because we have two aces up our sleeve:
A request to any invalid URL after http://<hostname>/api/rest points us to an auto-generated help page where every endpoint (and its usage) is described.

Figure 5: REST endpoint descriptions
So there is documentation after all. Neat.
The other ace is an additional program that’s mentioned in the endpoint descriptions: A Reporter Utility.
This program is the reason why I assume the REST API is more of an internal thing. In my head, there’s a meeting where some management person yells: “We need some metrics!”
I know, I know. I’m being overly dismissive here. But it could have totally happened that way!
Anyway, the Reporter Utility will prove invaluable for reversing the authentication process, as we’ll see next.
Authentication Reversing
I tend to follow the path of least resistance. For me, that means using what’s already present. So before we even think about reversing some binaries, let’s see how that Reporter Utility gets its data from the network.
Everything in our VM is set up with HTTP, so we don’t have to worry about encryption.
We bust out our next big tool. One of the all-time greatest. One that doesn’t need an introduction: Wireshark.

Figure 6: Wireshark explaining the intricacies of packet analysis
We start capturing, set the filter to HTTP and enter our credentials into the Reporter Utility.
After the utility spits out the report, we comb through the capture.
Because there’s not much going on in our VM, we immediately identify the relevant requests:
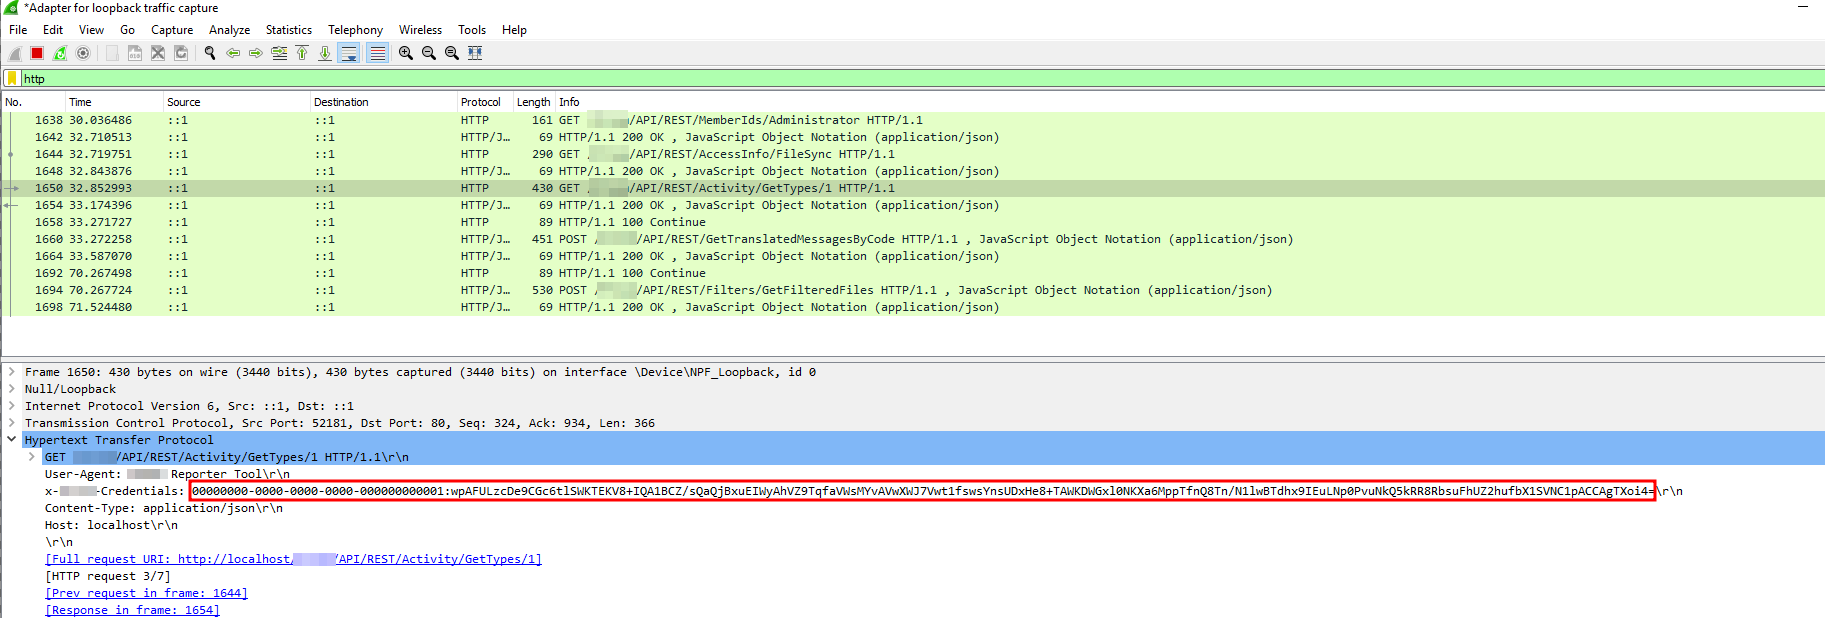
Figure 7: Header with credentials
Great, we see an authentication header. Let’s copy it into our own request:
HTTP/1.1 401 Unauthorized
The fuck?
Shouldn’t we be able to simply use the authorization header? After all, there are no additional cookies in place that could hold any state.
Do you remember how I previously said to not “even think about reversing some binaries”? Well, about that…
There’s clearly something going on behind the scenes. So peeking behind the scenes we will! We’ll talk more about reversing .NET applications down the line, but for now know this: It’s super convenient!
I’ll omit the reversing and listify the whole authentication process for your and my convenience:
- Ask about the user’s id via
/MemberIds/<eMail or username> - Ask for public key and access code via
/AccessInfo/<FileSync, Test etc> - Encrypt
<accessCode>@<password>with the public key and convert it tobase64 - Concatenate the user’s id and the encrypted string from the previous step (separated by a colon)
- Use the final string as
x-<redacted>-Credentialsheader - Every response contains a new access code in the
x-<redacted>-NextTanheader - Go back to step 3
AHA! Because we receive a new accessCode in every response, we couldn’t simply copy the credentials header. It was already exhausted!
Here’s some approximation of what needs to happen in order to construct a valid header (once):
| |
We receive the RSA public key as an XML string. Gladly, C# has us covered and we can simply use it as is in line 12.
The full header consists of the user id, a colon and the encrypted “accessCode@password” string.
Wow, that seems super duper secure! Immaculate.
I really don’t know why that process is so complicated. What’s wrong with basic authentication? Their implementation has a few advantages, though:
Capturing a basic authentication value gives an attacker clear-text credentials. There’s no encryption in place, only base64 encoding. That’s why you should never ever EVER use basic auth without HTTPS!
So I guess in some way, they achieve what they want. Nothing gets send unencrypted over the wire6. And even if captured, the credentials cannot be reused.
Then again, they do hardcode their private RSA key:
| |
I think it’s fair to assume that the key is the same across all deployments. That’s certainly not great. One could get hold of the key either by reversing legitimately obtained binaries, or by abusing some file disclosure vulnerability7 in the app itself.
With the key, the advantage is gone. We could simply decrypt the credentials header, take the password and create a new one.
I’m probably preaching to the choir, but again: Always use HTTPS!
Okay, we have a potential attack vector for someone malicious inside the network. That’s definitely not good enough, so what else can we come up with?
Pass the Hash
While searching for potential values for the /AccessCode endpoint, I’ve stumpled across several hardcoded ones:
| |
The Reporter Utility uses the last one. But what exactly do these codes represent? Accounts?
After a bit of digging in the database, I’ve stumpled across most of them:

Figure 8: API accounts
Look, there are even more! The code never mentions <redacted>Acm@<redacted>.de, so naturally we wonder what that’s about. Let’s keep digging:

Figure 9: Undocumented admin account
So the first row is our own account. But what is the second administrator account doing there? I’ve never created that user! Don’t tell me we’ve found backdoor.
Let’s quickly grab the hashed password of this ominous user and take it for a spin.
Wait a second, the hash doesn’t give us anything immediate useful.
There are a few possibilities for our next steps:
Obviously cracking, but the highest-end graphic card in my possession is a GTX 780 TI, so probably not the best idea.
Maybe we can find out more about the exact hashing method used. Let’s do some more digging:
| |
Again, I’ve paraphrased to code a bit. But this is what’s essentially happening.
Don’t you think that magic salt in line 6 looks suspicious? I’ve changed the value for the article, but it’s still a constant.
Shouldn’t a salt be random? I’ve only ever made it to set 2 of the Cryptopals challenges, so who am I to judge?
What I do know is that cracking a hash just got a lot simpler thanks to us knowing quite a large part of the to-be-hashed string.
We, however, are not going to burn a single CPU cycle on brute-forcing the password. While reading through the decompiler output, another interesting thing stood out:
| |
There’s quite a lot going on, so let’s unpack it.
The value of the custom credentials header gets split at the colon in line 12. You may recall that the part before the colon is the user id and the part afterwards an encrypted and encoded string containing the access code and password.
It gets really interesting from line 23 onwards. If the provided string after the colon is less than 100 characters long, it’s simply treated as the hashed password. This in turn circumvents the whole one-time access code authentication dance we described earlier. No decryption of the password. Nothing.
Whether we provide the hashed password directly, or the app itself extracts and hashes it, both code paths arrive at line 38 where the hashed password gets compared to the one from the database. If they check out, our Identity object gets assigned some claims (e.g. an admin claim).
Why is that pass the hash-like functionality integrated? I have no idea 🤔. A running theme, I guess.
Alright, we gained knowledge of what we assume to be an undocumented backdoor account with administrative rights. Its hashed password could be found in the database.
Furthermore, we discovered a way to short-circuit the authentication process and directly pass the hash.
This is an amazing discovery! We all know it: This account is probably also present in every deployed instance.
Giving It a Rest
Let’s take the Account Management (ACM) account for a spin, shall we?
After creating a file with our own test account via the normal web page, we try to acquire it with the backdoor account through the API:
HTTP/1.1 401 Unauthorized
The fuck? Again?
Quickly calculating the hash of our own password and using it in the request does give us access to the file. So our assumptions about passing the hash are right. Moreover, we can use the ACM account for a couple of calls that do need authentication.
There has the be a more complex authentication scheme in place, as an administrative account alone doesn’t give us access to everything.
Realtalk: It was at this point were I’ve gotten really frustrated. It seemed we’ve gotten the keys to the kingdom, but they didn’t open anything! After feeling sorry for myself for a bit, I had a realization: An administrator has to be allowed to do something!
So while it may be true that we cannot mess with other users’ files, we could still try to compromise the app another way.
An idea materializes: What if the way forward isn’t through the REST API, but instead the actual app? If our backdoor account has a hashed password in the database, it must have a, well, password. And if it has a password, we should be able to simply log in, right?
The login page does indeed need the plain-text password. No short-circuits here! Is it finally time for some cloud-enabled hash cracking action?
Of course not! As it turns out, the MAGIC_SALT value from above8 is used quite often throughout the code that handles crypto stuff.
I have a hunch that this is going to work:
Figure 10: Trying magic string found via decompilation
Aaaaaaand we’re in!
It’s a bit anticlimactic, right? But: Don’t look a gift horse in the mouth, so we’ll just take it.
An Inside Job
We’re inside. Again. Only this time we used an account managing backdoor account instead of our own one.
The site behaves a little wonky as a result of the ACM account not being linked to anything. After a bit of clicking around and manually altering the URL we’re finally in.
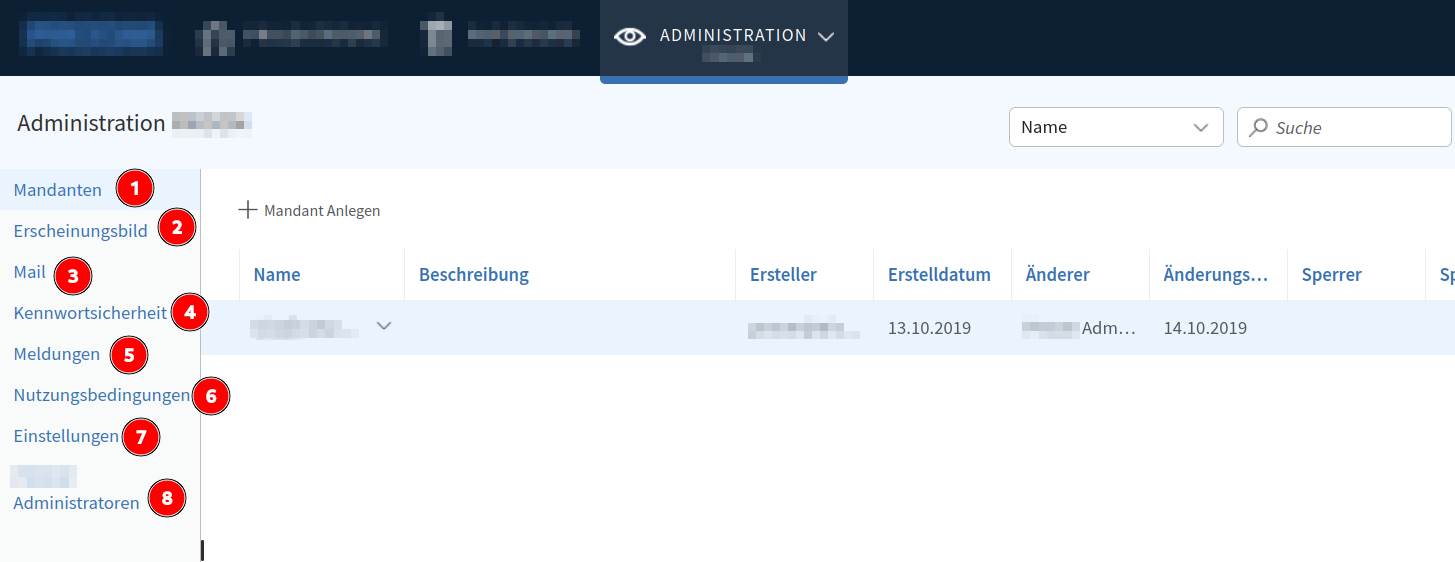
Figure 11: The admin area
Wow, we gained access to big functionality!
We can alter the appearance of the site (❷) and change the password restrictions (❹). Furthermore, the site lets us upload terms of use (❻) and link to a privacy policy (❼).
Mail (❸) settings include SMTP configuration and templates.
If that’s not enough for you, how about sending notifications to everyone (❺)?
We can also see every admin account (❽). Well, except for our backdoor account! You might think that’s because we’re currently logged in with that account. But no, I’ve checked. It simply doesn’t show up. Oh, we can also add new admins.
Before we get to ❶, let’s quickly talk about the administrative hierarchy of the app.
There are, in fact, three different levels of admin access. Our backdoor account is the admin of the whole app. Beneath are the clients, which we can manipulate (❶). Those clients have their own admins. A client can have multiple organizational units, which themselves have admins.
Admins.
Here’s the hierarchy straight from the page:
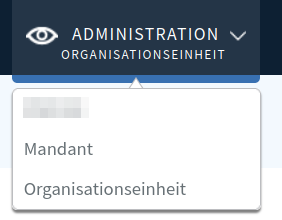
Figure 12: The three admin types
Every different admin role gives us access to different functionality. We’ll touch upon some of it later, but for now only one thing is important:
We can escalate from our initial ACM account all the way down to the organizational units, just by using the web page as intended. This means we will eventually gain access to every single file!
Pretty good, right?
But wait, there’s more: You remember the stored XSS in the comment section, don’t you? It turns out the notification functionality (❺) is also vulnerable. We can create a notification containing our password-stealing payload that pops up for every user after login which they have to manually mark as read.
Obviously it’s a bit noisy, but maybe we could get away with something like a fake downtime notification without raising too much suspicion.
Lord of the Files
- Circumvent
REST APIauthentication scheme? ✔️ - 2x stored
XSS(including one that pops for every user)? ✔️ - Authentication bypass through backdoor account? ✔️
After having completely compromised the app internally, it’s time to lay our eyes onto the server itself.
There are a couple of things we can look for: reading files from the server, make requests as the server (SSRF) and of course remote code execution (RCE).
This app handles so many files, it would almost be embarrassing to not find any vulnerability. Oh oh, is that foreshadowing?
You Won’t BELIEVE What Decision They’ve Made
Well, that’s maybe a bit too dramatic. But the developers made one game-changing decision, be it with security in mind or not: They use a third-party WebDAV server component. Specifically, they adhere to one of the provided examples, which “stores all data including locks, file content and custom properties in Microsoft SQL Server database”.
Why is this so important? Because nothing touches disk! And when I say nothing, I literally mean nothing. I’ve checked file system events in the VM while working with the app: Nothing. Zip.
But let’s step back first. What even is WebDAV?
WebDAV is an HTTP extension protocol which provides a framework for working with files remotely. It’s used as the base for the whole app.
So, let’s set ourselves a simple goal: We want to be able to drop a file into a location of our choosing in order create a web shell.
We can simply use the intended upload functionality. The file doesn’t land on disk, though, but instead gets stored as a blob in the database. This means there’s no way for us to let the server execute it. Furthermore, we don’t even get a “real” path to the file. The URL simply points to a handler of the server-side code that receives the file’s id.
Next we could try to talk directly to the WebDAV component. The protocol implements custom HTTP verbs, like COPY and RENAME.
Copying sounds great! We provide a location header that points to some known directory on the server (where we could execute that file) and try to copy the previously uploaded file.
HTTP/1.1 200 OK
The fuck? Did it work?
Sadly no file was copied. Moving and renaming also doesn’t seem to work. Maybe I’m missing something, but at this point I’m tired.
Uploading Files Like a Boss
We had no luck with the standard file uploading capabilities. But what about the admin section? There are numerous possibilities for file uploads, like logos, terms of use etc. Usually those are a safe bet for getting a web shell, but guess what?
Even those are stored in the database. Very thorough indeed…
Figure 13: Inlined logo with the help of data URLs
I’m about done now! This single decision to store everything in the database really gets in our way. Trying to obtain RCE took way, way longer than anything else combined. I want it so badly, but I realize it’s time to walk away.
We have to end on a high 🎵, though.
Let’s See Paul Allen’s Card
One additional feature caught my eye: We can import contacts by way of vCards. It’s a file format that’s used for exchanging contact information.
The developers of the app actually hand-roll their own parsing, so we have a good chance of finding something interesting.
| |
There’s a class for every property they’ve implemented. Above is the one for the PHOTO property. A PHOTO can either hold a base64 encoded version of the image inline, or point to an external URL. To my surprise, the developers implemented both scenarios.
A VcardPhoto object can hold a byte array and has two methods. Fill() gets called while parsing a vCard. It checks if the sub-property “VALUE” is set to “URL”. If not, the value of the property itself will get treated as the raw image bytes.
Otherwise, it gets interesting: A call to the classe’s second method FillImageFromUrl() is made. There, a request to our provided URL is made via WebRequest.CreateDefault(). Let’s investigate this method a bit:

Figure 14: Image from the official documentation
Nice, we can make requests to arbitrary files on the server via the file URI scheme. They’d then get “displayed” as an inline profile picture, just like the logo from above. What a funny way to exfiltrate files!
This crafted vCard should do the trick:
| |
Oh my God, it even has a watermark!
Anyway, line 5 is the important one. The code looks for a VALUE of URL, which we provide together with an actual image for testing.
We cross fingers 🤞 and upload the card. It doesn’t work. We alter the URL to point to our own little python -m http.server 8000. It doesn’t work. No request is made.
Because I couldn’t believe it, I went ahead and attached dnSpy9 to the running instance in order to do some dynamic analysis. It took a hot minute to get it to work, but the result is amazing: Debugging a running application and setting breakpoints in the decompiled code is quite magical.
Apart from that, it did actually help. Even though it was completely unnecessary. Why is that?
Well, have another look at the code from above. Do you see it? Line 8.
The property variable refers to an VcardProperty. As you can see in line 26, such an object has a Value member. This is what the developers wanted to stringify, as it holds the URL. Our exfiltration would have worked, if only the developers had used the correct property.Value.ToString() here. Instead, the default Object.ToString() method simply gives us the fully qualified name of the object.
A bug that prevents exploitation?!
That’s a wrap, folks. Like Don Toliver, I’ve HAD ENOUGH!
Recapitulation
What an emotional roller coaster! Let’s recap what we achieved:
We quickly discovered our first XSS vulnerability in the comment section. Being the thorough people that we are, we took a little detour to get a more flashy payload than simply popping an alert box.
Said payload programmatically appends a <form> that might get autofilled, which would give us clear-text credentials.
Afterwards we looked at the REST API. Because there was no documentation about the authentication process, we analyzed the network traffic of a packed-in program that generates reports via said API. Using the discovered credentials header didn’t provide us with access to the data, suggesting something else was going on.
At this point we started to reverse some of the binaries. A process that’s incredibly smooth in the .NET world. As a result, we gained a clear understanding of how to properly authenticate to the API. We also found some interesting strings.
Those strings led us to information gathering in the database, were we stumbled upon an administrative account we never set up.
The hashed password of said account wouldn’t have been useful if it weren’t for another discovery: We can simply pass the hashed password to the API instead of doing the complicated authentication process we discovered before.
Sadly, almost nothing useful could be retrieved with that account. Via REST API, that is. We wondered if we could log into the page like any normal user. Scared of cracking hashes, we tried a string which is used as the salt for the different home-baked hashing functions.
Jackpot 💰.
Logging into the site as the admin gave us plenty of opportunities. One of which involved the same XSS payload as above, only this time firing for every user on login.
Apart from that, we could also escalate our privileges all the way down to the last private user file.
For the grand finale we wanted to temper with the server itself. This part took by far the longest, even though the article doesn’t reflect it.
The real showstopper was the way files are handled: Everything is stored as blobs in the database, instead of directly on the file system.
We tried playing with the underlying WebDAV server and uploading special files as an admin, but nothing worked.
One thing that would have worked was exfiltrating files from the server via a forged vCard. Only this time a bug was actually in our way instead of enabling us to do unimaginable things. Too bad.
I’ve also tested many other things on my own:
Searching for possible SQL injection (SQLi) via static analysis didn’t give me any results, because everything seems to correctly use parameterized queries.
XML External Entities (XXE) are beyond the scope of this article10, but every instance of a deserializer seems to be correctly configured (or at least the default configuration is sane enough) to not allow external entities.
One huge time sink was a ViewState rabbit hole I went down, which falls under (de)serialization vulnerabilities. In the end I realized that we deal with an ASP.NET MVC app, instead of an ASP.NET Web Forms one. Only the latter makes use of ViewState. Feels bad, man!
Overall, the app has some surprisingly robust parts, while severely lacking in others.
Conclusion
I’m really happy with the outcome of this research. Even though I know my way around many things web, there were plenty of concepts new to me. Some paths led to the discovery of bugs and their exploitation, others led to nowhere. But every path produced tons of knowledge and notes which I can refer to in the future.
Maybe the situation would look different if I didn’t produce any results. But as it stands, I’d call this venture a great success 👍🧔👍!
I went from clicking around in the UI in the beginning to a more structured approach in the end. I’m certainly not talking about methodologies any time soon, because to me the technical side is way more interesting. Having said that, I gained a lot of understanding of where to look for bugs and inconsistencies in a structured manner.
And remember: We’re doing this for fun, we don’t have to be super efficient!
I’m sure there’s plenty of things we didn’t find, but that’s okay. If anything, this exercise taught me that everything is broken. So why bother looking only at one specific thing, if there’s so much beautiful brokenness out there.
Thank you so much for reading!
Right click -> “Edit and Resend” in
Firefox- no need forBurp Suite↩︎That’s why you always want to send a confirmation link to the user. ↩︎
Like “clicking” the logout button 😈. ↩︎
Go ahead, guess my age! ↩︎
Remember: The cookies will automatically get attached to the request. ↩︎
I’m talking about the payload, not the transport layer itself. ↩︎
Don’t worry, we’ll get to that. ↩︎
The string contains the company’s name, so I’ve altered it. ↩︎
Which is one of the available decompilers. ↩︎
Finally something is! I want to rest now. ↩︎